Table of Contents
LANTIME: Configuring RADIUS Authentication
RADIUS stands for Remote Authentication Dial In User Service. It is an external authentication method which is supported in LANTIME firmware V6 and newer.
Configuration through the LANTIME WebUI
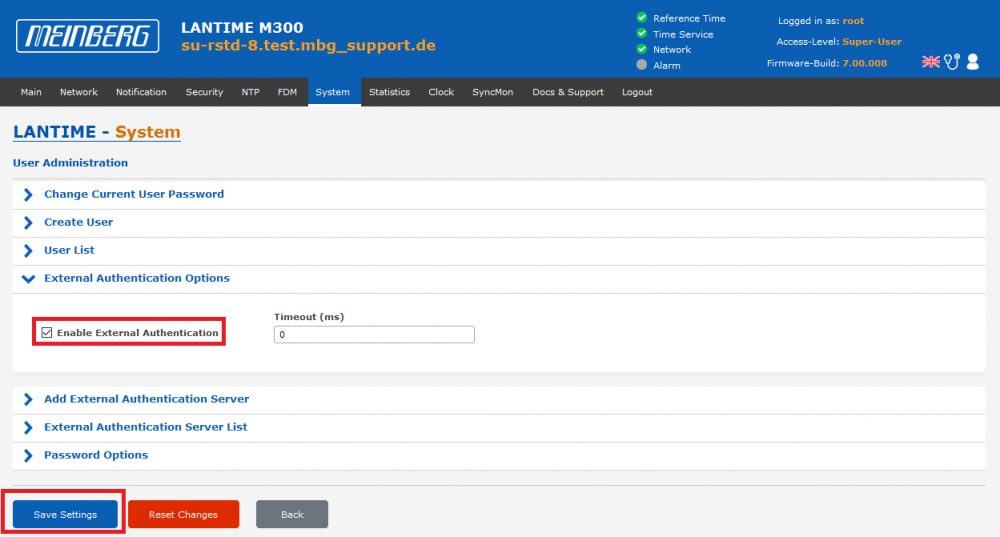
1. External authentication needs to be enabled first. This can be done on the System page –> User Management –> User Administration –> External Authentication Options:
2. Press Save Settings
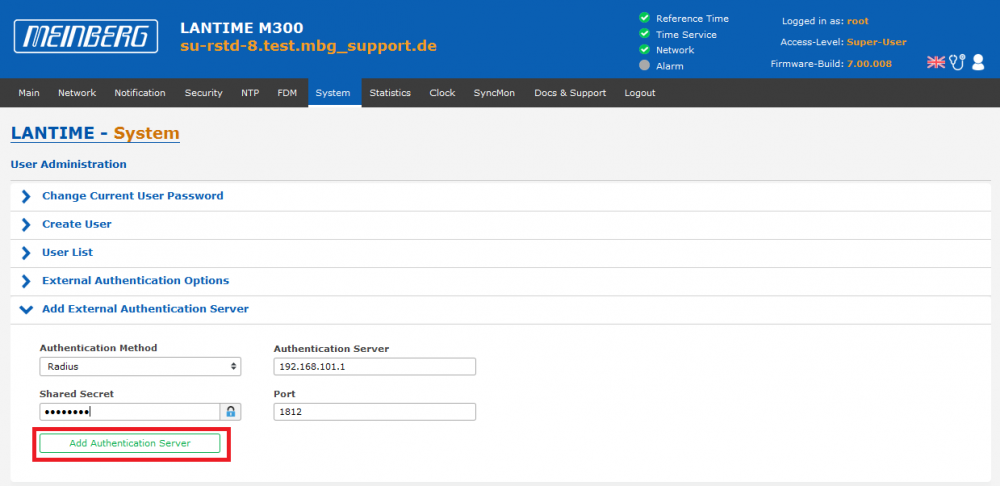
3. The RADIUS server itself has to be configured under System' page –> User Management –> User Administration –> Add External Authentication Server:
4. Fill out the form above and click Add Authentication Server
What needs to be done on the RADIUS Server?
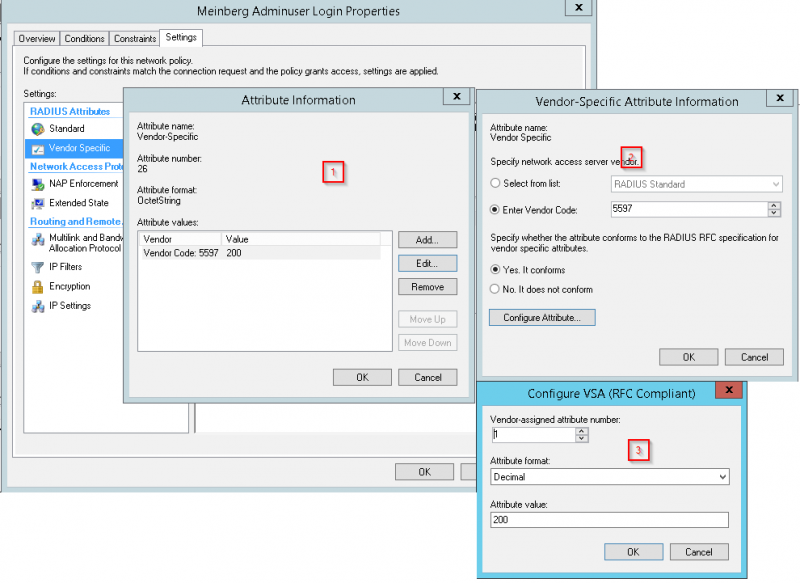
A Vendor Specific Attribute (VSA) called MBG-Management-Privilege-Level has to be added to the configuration of the external authentication server. Below some additional information on the attribute:
Name = MBG-Management-Privilege-Level
Datatype = Integer
Vendor-Code = 5597
Vendor assigned attribute number = 1
Value range = 100, 200, 300
In addition a value of 100 (=Super User) or 200 (=Admin User) or 300 (=Info User) has to be assigned to this attribute for each RADIUS user, who should be able to login to the LANTIME.
Troubleshooting
If the authentication is not working, there are several possible reasons:
- The configured shared secret on the LANTIME does not fit to the one on the RADIUS server
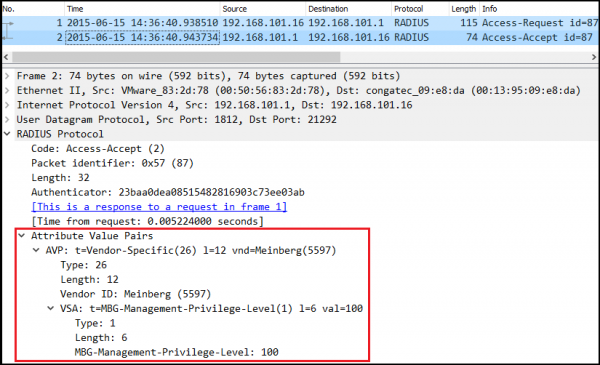
- The Meinberg Vendor Specific Attribute is not added by the RADIUS server to the ACCESS-ACCEPT packets sent to the LANTIME. The LANTIME is therefore not able to map the user correctly. The screenshot below shows how an ACCESS-ACCEPT packet sent by a RADIUS server should look like:
- The LANTIME is not in the same network subnet as the RADIUS server and no default gateway has been configured in the LANTIME webUI under –>
Network–>Default Gateways. Due to the missing gateway, the LANTIME is unable to send theRADIUS ACCESS-REQUESTPackets to the configured RADIUS server. - The RADIUS
NAS-IPparameter in anACCESS-REQUESTPacket sent by the LANTIME is by default set to 127.0.0.1. Some RADIUS servers expect the parameter to be set to the IP from which theACCESS-REQUESThas been sent. The defaultNAS-IPcan be changed through the LANTIME command line interface. The following chapter describes the procedure in detail.
Change RADIUS NAS-IP (Supported since LANTIME Firmware 6.20.017)
The RADIUS NAS-IP parameter in a RADIUS ACCESS-REQUEST Packet sent by the LANTIME is by default set to 127.0.0.1. Some RADIUS servers expect the parameter to be set to the IP from which the ACCESS-REQUEST has been sent. The default NAS-IP can be changed through the LANTIME command line interface:
1. Connect with the root user via SSH to the LANTIME command line interface.
2. Run the following command to change the NAS-IP (192.168.101.16 in the example below, needs to be replaced by the correct IP):
lt_cfg /etc/mbg/ext_auth.cfg alter GENERAL RADIUSOPTIONS 'nas_ip=192.168.101.16'
3. Run the following command to apply the configuration change:
sudo netconfig
4. Run the following command to save your change permanently.
sudo saveconfig

In LTOS 7.06.001 - 7.06.006 there was a bug that caused the configured NAS IP to not end up correctly in the access request packet. The bug has been fixed in 7.06.007.
Change RADIUS NAS-IDENTIFIER
The RADIUS NAS-IDENTIFIER in a RADIUS ACCESS-REQUEST Packet sent by the LANTIME can also be changed through the LANTIME command line interface:
1. Connect with the root user via SSH to the LANTIME command line interface.
2. Run the following command to change the NAS-IDENTIFIER (in the example below the identifier is changed to 'test'):
lt_cfg /etc/mbg/ext_auth.cfg alter GENERAL CLIENTID 'test'
3. Run the following command to apply the configuration change:
sudo netconfig
4. Run the following command to save your change permanently.
sudo saveconfig
Configuration Examples
Linux FreeRADIUS Server
1. The Meinberg Dictionary File (https://www.meinberg.de/download/firmware/dictionary.meinberg) needs to be stored under /usr/share/freeradius/dictionary.meinberg
2. Define RADIUS client networks in the /etc/freeradius/3.0/clients.conf file, e.g.:
#  You can now specify one secret for a network of clients.
#  When a client request comes in, the BEST match is chosen.
#  i.e. The entry from the smallest possible network.
#
client 192.168.101.0/24 {
        secret          = meinberg
        shortname       = LANTIME-Devices
}
The secret in the example above needs to be the same as the shared secret configured for the RADIUS server in the LANTIME WebUI.
3. Define users in the /etc/freeradius/3.0/users file, e.g.:
ltsu    Cleartext-Password := "test123"
        MBG-Management-Privilege-Level = "100"

ltadm   Cleartext-Password := "test123"
        MBG-Management-Privilege-Level = "200"

ltinfo  Cleartext-Password := "test123"
        MBG-Management-Privilege-Level = "300"
The example above shows 3 different users named ltsu, ltadm and ltinfo. The login password for all of them is test123. ltsu is a LANTIME Super User (100), ltadm is LANTIME Admin User (200), and ltinfo is a LANTIME Info User (300).
Microsoft NPS Server
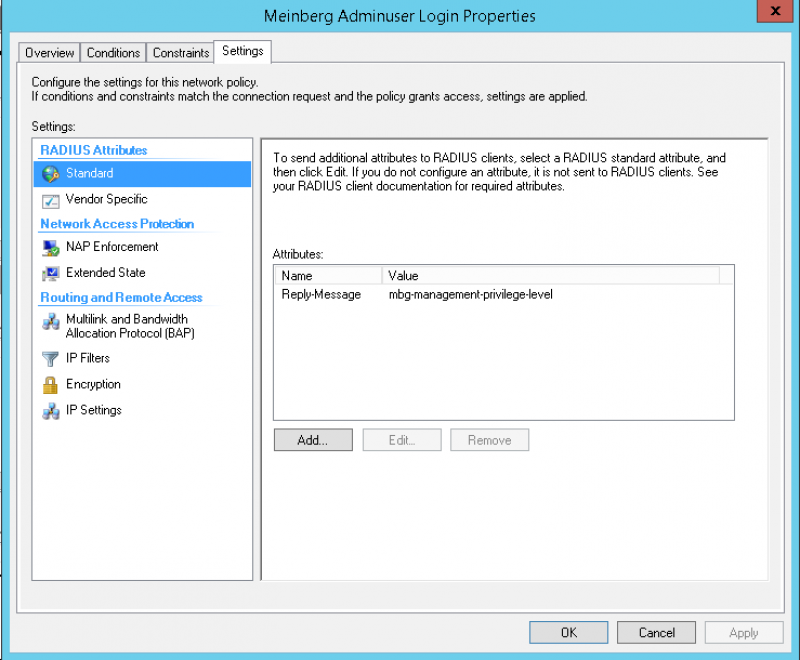
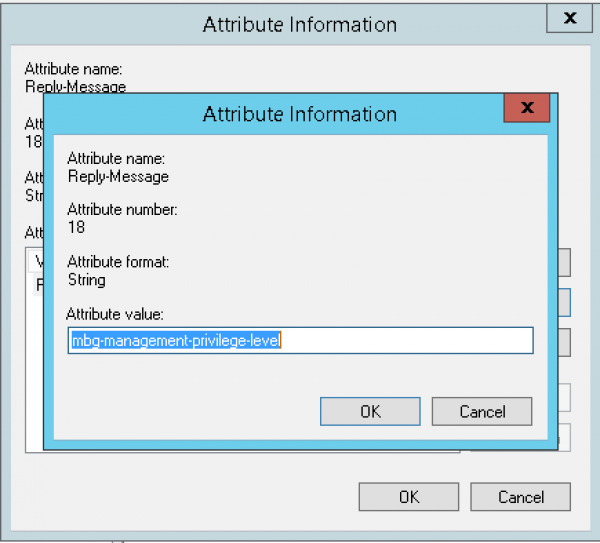
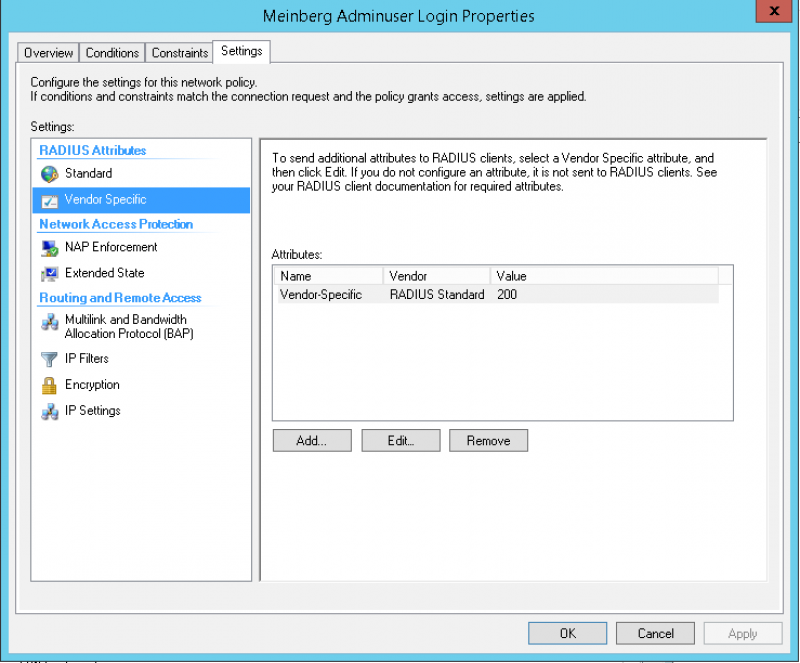
On a Microsoft NPS Server it is necessary to add a standard radius attribute called Reply-Message and setting that with a value of mgb-management-privilege-level. Below are some screenshots:
Further Assistance
If further assistance is required, contact Meinberg Technical Support: https://www.meinbergglobal.com/english/support/tech-support.htm
— Manuel Schäfer manuel.schaefer@meinberg.de, last updated 2025-02-11
