LANTIME: Distributing Local Time via NTP
In general, NTP servers distribute UTC time in a network, since the NTP time synchronization is based on UTC. The handling of time zones is a task of the operating system on which the NTP client is running. For example, if you configure Windows to use your local time zone, the system clock is still based on the UTC time scale. Only when the date/time is displayed (e.g. in a clock application), it is converted from UTC to the locally configured time zone.
However, in some applications, NTP clients require to receive local time instead of UTC. This article describes how a LANTIME can be configured to distribute local time via NTP.
Requirements
- Firmware LTOS V6.xx.xxx or higher
- LANTIME device with an integrated satellite, longwave or IRIG timecode receiver module
- NOT supported by LANTIME/RDT devices (devices without internal receiver module)
- NOT supported by SyncFire devices
- NOT supported by HPS100 modules in NTP mode
- If the LANTIME needs to be synchronized by an external NTP server that provides standard UTC time, a LANTIME M300/MRS or a LANTIME IMS system (M500, M1000, M2000, M3000…) is needed if the received UTC time needs to be “converted” to a local time
Configuration through the LANTIME WebUI
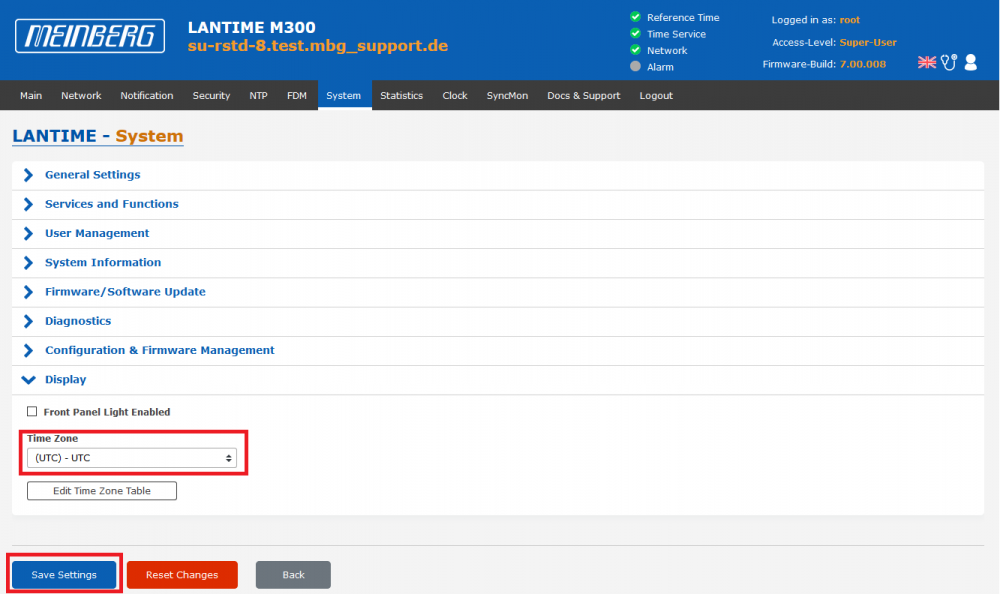
1. As a first step the time zone at the front panel display needs to be changed. This can be done on the System page –> Display:
2. Select the correct time zone from the Time Zone selection box. If your time zone is not available in the Time Zone selection box, you can use the Edit Time Zone Table button to add a new time zone definition. If you are unsure how to configure your time zone correctly, do not hesitate to contact the Meinberg Technical Support Team.
3. Click Save Settings.
4. The time in the front panel LC display and in the WebUI under Main –> Date/Time section should now be displayed with the newly configured time zone.
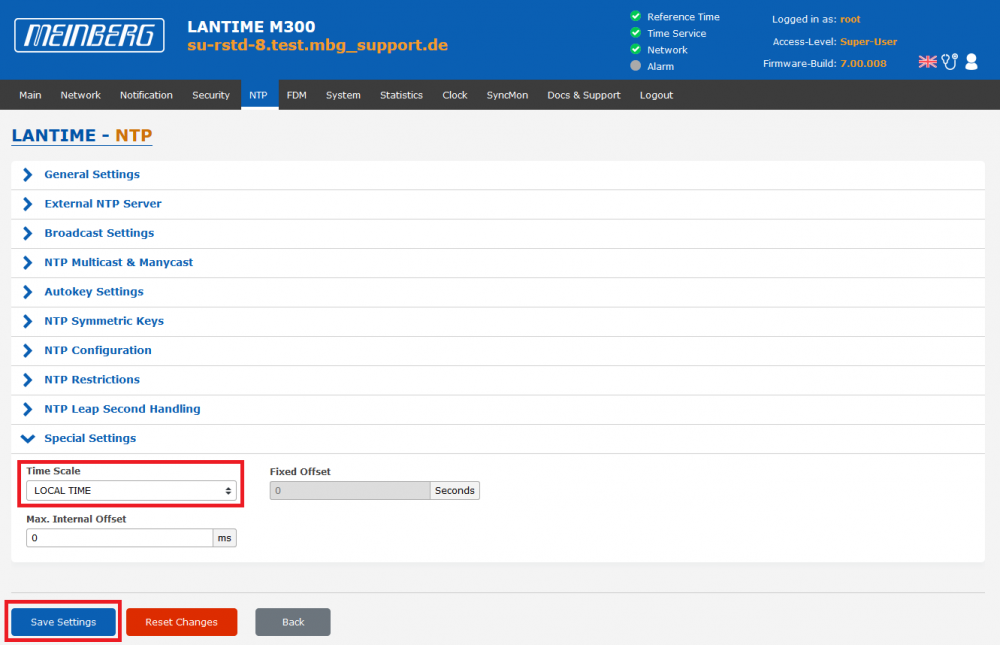
5. In order to tell the device to use this time zone for NTP as well, the time scale for NTP needs to be changed under NTP –> Special Settings from 'UTC' to 'LOCAL TIME':
6. Click Save Settings.
7. The WebUI will now display the following warning:
8. You have to click Save Settings once more to confirm the configuration change.
Further Assistance
If further assistance is required, contact Meinberg Technical Support: https://www.meinbergglobal.com/english/support/tech-support.htm
— Manuel Schäfer manuel.schaefer@meinberg.de, last updated 2023-05-16


